Discord Notifications
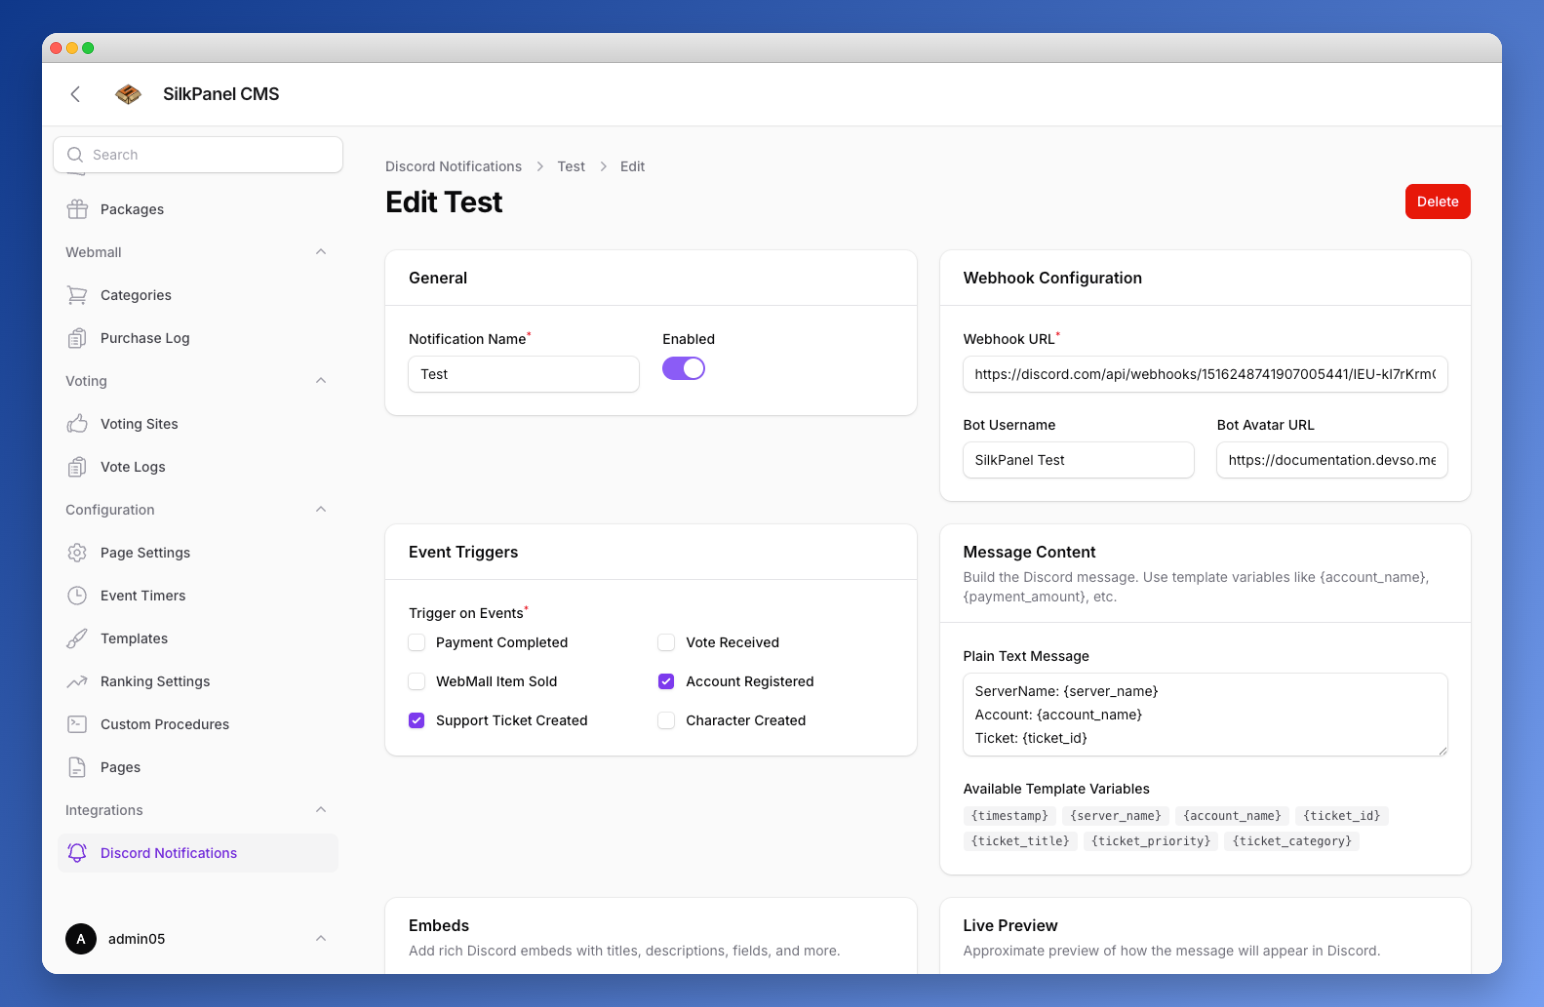
The Discord Notifications system lets you receive real-time alerts in any Discord channel whenever important events happen on your server — payments, new accounts, support tickets, WebMall purchases, and votes.
Notifications are fully configurable from the admin panel. You can create multiple webhooks targeting different channels, each with its own set of events, message content, and rich embeds.
Features
- Multiple webhooks — send different notifications to different Discord channels
- Visual message builder — build rich Discord embeds without touching any code
- Live preview — see exactly how your message will look in Discord before saving
- Template variables — automatically inject event data into messages using
{placeholders} - Clickable variable chips — click any variable to copy it to your clipboard
- Per-notification event filtering — each notification subscribes only to the events you choose
- Test button — validate your webhook URL with a test message instantly
- Delivery logs — full history of every webhook attempt with payload and response inspection
- Queue-based delivery — webhooks are sent asynchronously and retried up to 3 times on failure
Supported Events
| Event | Description |
|---|---|
| Payment Completed | Triggered when a donation payment is successfully processed |
| WebMall Item Sold | Triggered when a player purchases an item from the WebMall |
| Support Ticket Created | Triggered when a player submits a new support ticket |
| Vote Received | Triggered when a player casts a vote on a voting site |
| Account Registered | Triggered when a new user account is created |
| Character Created | Triggered when a new in-game character is created |
Template Variables
Each event exposes a set of variables you can use anywhere in your message — in the plain text content or inside any embed field. Variables are replaced automatically when the notification is sent.
Common Variables (all events)
| Variable | Description |
|---|---|
{server_name} | Your application name from config |
{timestamp} | ISO 8601 timestamp of the event |
Payment Completed
| Variable | Description |
|---|---|
{account_name} | Display name of the paying user |
{payment_amount} | Payment amount (e.g. 10.00) |
{payment_currency} | Currency code (e.g. USD) |
WebMall Item Sold
| Variable | Description |
|---|---|
{account_name} | Display name of the buyer |
{character_name} | In-game character name used for the purchase |
{item_name} | Name of the purchased item |
Support Ticket Created
| Variable | Description |
|---|---|
{account_name} | Display name of the ticket author |
{ticket_id} | Unique ticket ID |
{ticket_title} | Title of the ticket |
{ticket_priority} | Priority level (e.g. low, medium, high) |
{ticket_category} | Category name |
Vote Received
| Variable | Description |
|---|---|
{account_name} | Display name of the voter |
{vote_site} | Name of the voting site |
Account Registered
| Variable | Description |
|---|---|
{account_name} | Display name of the newly registered user |
Character Created
| Variable | Description |
|---|---|
{account_name} | Display name of the account owner |
{character_name} | Name of the newly created character |
Setup
1. Create a Discord Webhook
In your Discord server, go to Channel Settings → Integrations → Webhooks → New Webhook. Copy the webhook URL.
2. Configure a Notification
Go to Admin → Integrations → Discord Notifications → Create.
Fill in:
- Name — a label for this notification (e.g. "Payment Alerts")
- Webhook URL — the URL you copied from Discord
- Bot Username (optional) — overrides the webhook's display name
- Bot Avatar URL (optional) — overrides the webhook's avatar
- Events — select which events should trigger this notification
3. Build Your Message
Use the Message Content field for a plain text message that appears above embeds. Use {variable} placeholders — click any chip in the "Available Template Variables" section to copy it.
Use the Embeds section to add rich embed cards. Each embed supports:
| Field | Description |
|---|---|
| Title | Bold clickable title (set URL to make it a link) |
| Description | Main body text, supports {variables} |
| Embed Color | Color bar on the left side of the embed |
| Timestamp | Automatically set to current time |
| Author | Author name, icon, and URL |
| Footer | Small text at the bottom |
| Thumbnail | Small image in the top-right corner |
| Large Image | Full-width image below the content |
| Fields | Up to 25 key/value pairs, optionally inline |
The Live Preview updates as you type and shows an approximate rendering of how the message will look in Discord's dark theme.
4. Test the Webhook
On the notifications list, click the Test button next to any notification. A test message with sample data will be sent immediately. Check the Delivery Logs tab on the edit page if anything goes wrong.
Queue & Cron Configuration
Discord notifications are dispatched as queued jobs via the Laravel scheduler. To ensure they are delivered, the cron job must be active on your server.
The admin panel shows a Scheduler Status banner on the Discord Notifications page that automatically detects whether the scheduler is running and displays the last heartbeat time. If it shows a warning, set up your cron first.
Setup instructions by platform:
- General → Cronjobs — What It Does
- Ubuntu/Linux → Step 17: Configure Cron for Scheduled Tasks
- Windows (Laragon) → Step 8: Configure Laravel Scheduler in Laragon
Delivery Logs
Every webhook attempt is logged. On the edit page for any notification, open the Delivery Logs tab to see:
- The event that triggered the notification
- Whether delivery was successful
- The exact JSON payload sent to Discord
- The raw response from Discord (useful for debugging rejected payloads)
Failed deliveries include the error message and are retried up to 3 times with a 30-second backoff.
Tips
- One notification per channel — create separate notifications for different Discord channels (e.g.
#payments,#support,#registrations) rather than routing everything to one channel. - Variables in embeds — variables work in every text field: embed title, description, field names and values, footer text, and author name.
- Embed color — use the color picker to set the left border color. Each event type can have a distinct color for quick visual identification.
- Inline fields — toggle "Inline" on multiple fields to display them side by side (up to 3 per row in Discord).